What is it?
You can find your unique ChemCloud AI email address on the settings page here. It should look like chemcloud-ai-dk29ls@mail.app.chemcloud.com.au. Forward any email to this address and ChemCloud AI will:- Read the email
- Classify it (as a quote, order update, document)
- If relevant, update your data in ChemCloud.
- A supplier sends you a quote, fwd it to ChemCloud AI and it will upload the quote for your review in the platform
- A supplier sends you an order confirmation, fwd it to ChemCloud AI and it will update the status and ETA of your order
- A supplier sends you a COA, fwd it to ChemCloud AI and it will attach the COA to the relevant order
Integrate ChemCloud AI in your workflow using an email group
Instead of manually forwarding every email to ChemCloud AI, you can ensure that suppliers send emails to an email group and include your ChemCloud AI email as part of that group. When an email is sent from ChemCloud (e.g. an RFQ), the supplier is instructed to reply to a defined email address (e.g. purchasing@yourcompany.com.au).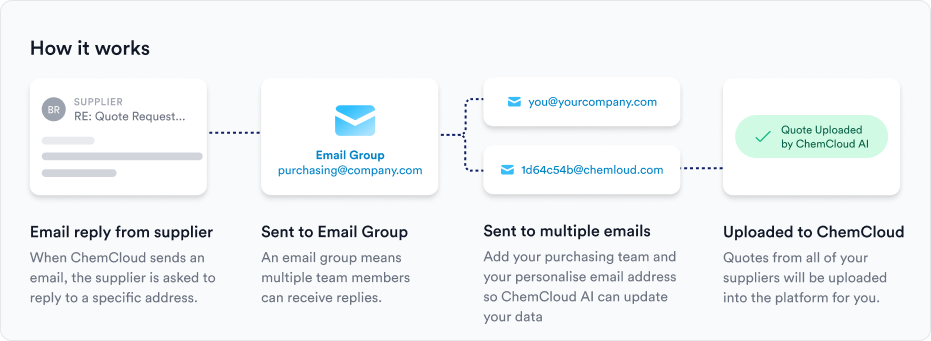
How to set up an email group
Setting up an email group should be quite straightforward, although it can change depending on which version of email provider you are using. The main things to look out for are:- Make sure multiple email addresses can be members of the group
- Ensure that external email addresses can be part of the email group
Generic instructions for how to setup an email group in Microsoft Office
Here are some generic instructions on how to setup an email group in Microsoft Office. If these don’t work - you might be best to ask ChatGPT how to set it up with your version of Microsoft.📧 How to Create an Email Group in Microsoft 365 (Outlook) with External Addresses
👥 Step 1: Go to the Microsoft 365 Admin Center- Sign in to admin.microsoft.com with your admin account.
- In the left-hand menu, go to Groups > Groups.
- Click “Add a group”.
- Choose Distribution (for a standard mailing list).
- Click Next.
- Enter a Group name (e.g. Customer Onboarding)
- Optionally, fill out a description to help others understand the group’s purpose.
- Click Next.
- Search for and select your team members.
- You must first create them as Contacts in your Microsoft 365 environment:
- Go to Admin Center > Users > Contacts.
- Click “Add a contact”.
- Fill in the name and external email address (e.g., john@partner.com).
- Click Add.
- Once created, go back to your group setup and add the external contact(s).
- Set whether users outside your organization can send to the group.
- Choose whether group members can view messages in Outlook.
- Click Next, review the settings, and click Create group.
- Microsoft 365 Admin Center > Groups
- Or directly in Outlook (web) under People > Groups